
Overview
With spectacular views of the Ladybower Reservoir and hidden paths through wooded ravines, this is an edge hike not to be missed
A few miles north of the quaint village of Bamford, lies the beautiful Derwent Valley. Home to a number of spectacular twentieth-century reservoirs, this area of the Peak District is renowned for its vibrant purple heather, natural gritstone sculptures, and incredible sunset vistas. The millstone grit escarpment of Derwent Edge is one of those "must-do" hikes; it will take you on a journey through time from the famous "Dambuster" training runs of the 617 squadron, to the mysterious disappearance of a boy from the lost village of Derwent.
The hike starts at the Derwent Visitors Centre, close to the foot of the imposing Derwent Dam; from here, you will make your way up a steep wooded hillside until you reach a vast moor known as Little Howden. Lost Lad hill will be your next destination, situated in a beautiful location high above Ladybower Reservoir; it comes with a brilliantly sad story (see the Interesting Facts section), an orientation table, and impressive views of the surrounding countryside. After locating some of the neighbouring hills using the handy toposcope ↗, you will head to Back Tor, which is the highest peak in the area at 538m. The hike then continues across Derwent Edge, where you can stop along the way to admire the unusual rock formations which have been shaped over many centuries by frost, rain, and wind. For the last leg of your journey and with the reservoir acting as the most picturesque of backdrops, you will be heading back downhill past an old abandoned farm with beautiful beige stone outhouses, before making your way to the car park at Fairholmes and the end of the hike.
Go prepared, stay safe and enjoy the hike!
parking
The nearest car park to the start point of this hike is at the Upper Derwent Visitors Centre (the postcode is S33 0AQ), it's located at the very start of the hike, it's pay-and-display and costs £3.50* for up to 2 hours and £6* for 24 hours. Its open 24 hours a day, 365 days a year. For detailed information about the excellent facilities that are available at the site please download this document. The parking available is extensive and you shouldn't have an issue finding a space, however, there are alternatives, some of which are free, and located very close to the start of the hike; these alternatives can be found below. For those using public transport, click ''Directions'' on the map above and change the method of transport in the top left of the Google Maps page to ''Public Transport'' (the little blue train), alternatively please refer to the site document mentioned earlier.
*Correct at time of writing. For up-to-date pricing click here ↗.
Alternative parking
4 minute walk to start of hike**
6 minute walk to start of hike**
8 minute walk to start of hike**
16 minute walk to start of hike***
Note: All of the above car parks are located to the left or right of the main road which heads to the Upper Derwent Visitors Centre, there are other parking locations which I haven't listed as they are just dirt laybys at the side of the road.
** Free (correct as of June 2026)
***Costs £2.10 for 1 hour, £3.40 for 2 hours, £5.50 for 4 hours or £6.60 all day (this is for cars, and correct as of June 2026)
route map
Map Key
Play Route
Birds Eye View
Pause Route
Fullscreen
Restart Route
Zoom In
Centre Camera
Zoom Out
Cinematic View
Change Layer
Speed Control
route GUIDE
Disclaimer: This route description, map, GPX file, and any related information are provided for general reference only. Conditions on the ground can change at any time due to weather, erosion, access restrictions, livestock, or other factors. You are solely responsible for assessing whether this route is suitable for you, your party, and any dogs, and for making your own decisions regarding navigation, safety, equipment, and timing. Distances, ascent, durations, difficulty indicators, and route lines are approximate and should not be relied upon as exact or comprehensive. By using this guide, you acknowledge that walking and hiking involve inherent risks, and you accept full responsibility for your actions and outcomes. See our Terms of Use & Disclaimer page for more information.
Note: When hiking I use the Ordnance Survey phone app as my main navigation aid, supported by a paper map and compass for emergencies. The OL1 Explorer map covers this hike, it can be bought directly from the Ordnance Survey website here ↗ or from Amazon here ↗. When you buy the paper map it gives you a code that gives you free access forever to the digital version on the phone app. I have previously used the Ordnance Survey subscription ↗ service, it was amazing, but personally, I like to have both paper and digital maps for those rare times when my phone lets me down.
1. Make your way to the start of the hike, which is located just outside the Derwent Visitor Centre (co-ordinates: 53.400724137043106, -1.7418694593138204), click here ↗ to open the start point in Google Maps. Once there walk to the right of the visitor's centre (red arrow on the next hover image) and you will soon see the walkway (marked by the blue dotted line on image 1) heading into the forest, follow this walkway. Follow the path until you cross a small stone bridge, after which you should be able to see the imposing sight of Derwent Dam (see image 2) straight in front of you. Depending on the time of year and how much rain there has been, you may be lucky enough to see the reservoir overflowing (see image 3). .
2. The path will start to bend quickly to the right but once you see the dam, head straight towards its large right-hand side tower, following the arrows on image 4. Once you reach the foot of the tower there is a gently sloped set of steps that will lead you up past the large tower, the steps will level out as you cross a path that leads to the tower, here you will continue upward on the next set of steeper steps which lead through a wooded area. At the top of these stairs, you will reach a path, turn left here and continue to walk along it until you reach a wooden gate which you need to go through (you get a stunning view of the reservoir on your left as you head along this path, including a view of the dam from the other side). Once through the gate, continue along this path until you can see a stone wall that forms part of a bridge. Instead of walking over the bridge, head to the right side of it (see image 5) and start following the path heading uphill through the forest, as shown by the red line on the previous image.
3. Walk along the path for approximately 150m meters, until you reach a wooden gate that you should pass through. There is a lovely stream on your left running parallel to the path you are taking, you will most likely also encounter a fallen tree which you can have some fun navigating, as well as an unusually carved stone with a hole in the middle (see image 6). Continue past the stone heading upwards on the path until it takes a sharp turn to the right (see "first right turn" on image 7). Continue to follow the path in this new direction until you reach a junction where you should turn left (see "first left turn" on image 7). Follow this path until you reach the top of the hill and see a fence in front of you, turn right here (see "second right turn" on image 7), and after around 20 meters there will be a locked gate with a stile (see image 8), turn left here (the "second left turn" on image 7) and head over the stile.
4. Once you are over the stile, head straight through the normally shin-high moorland vegetation following the path, eventually the vegetation will give way to grass; note that the path here is well-trodden and is obvious in most conditions. You will be walking on this path from the stile for approximately 110 meters, which at average walking pace will take you around 1 minute and 30 seconds. You will eventually reach a T-junction where you should turn left (see image 9), this path will head in a northerly direction (the reservoir is located to the west) for around 600m (which will take around 7 minutes at an average walking pace), and then it starts to head in a north-easterly direction for around 650m (which will again take around 7 minutes).
5. By now you should be able to see a small hill in the distance and you may even be able to make out the toposcope and cairn (a pile of stones) on its top (see image 10). This hill is Lost Lad and it is a sub-peak of Back Tor, a rocky outcrop which you should be able to see to the right of Lost Lad. The map in image 11 shows the route you should take through the moorland from when you head over the stile until you reach Back Tor, and then slightly beyond; as always, I recommend taking a map and compass or OS maps on your phone and using this guide as a last resort. If you are ever unsure where the path is or feel like you are getting lost, just head to the highest hill in the area to the north (remembering that the reservoir where you started the hike is west) and you will end up at Lost Lad, just look for the cairn and toposcope. From the stile to Lost Lad, the walk should take around 30 minutes. As a check, you should be able to see the view in image 12 on your right-hand side, on the way to Lost Lad (which will be in front of you).
6. Once you arrive at Lost Lad (which sits 518m above sea level) stop and admire the amazing view, using the handy toposcope to help you locate notable landscape features. Also, head over to the interesting facts section for the harrowing story of the Lost Lad of Derwent Village. From here continue along the path towards Back Tor, note that the cairn and toposcope should be on your left-hand side. The path will eventually turn from brick-sized rocks embedded in the ground to large, rectangular paving slabs, similar to the ones you find on the Pennine Way; these will lead you to Back Tor, which can be identified as the rocky outcrop with the white trig point at its top (see image 13).
7. After clambering up the rock face and touching the trig (if that's your thing), head back to the path and continue along it in the same direction you were originally heading (so the trig point is on your left). This next section of the hike is pretty straightforward, just follow the stone-paved path for 2 miles along Derwent Edge (which will take around 40 minutes if you don't stop for photos), taking in the stunning rock formations such as The Salt Cellar (see image 14) as well as many others in this area. About 1,000m from the Salt Cellar rock formation (about 12 minutes walk), is another amazing formation called Coach and Horses (see image 15), and a further 520m from here (6 minutes walk) there is a junction of multiple paths with a sign (see image 16) indicating that a left turn will take you towards Moscar, whilst a right turn will take you back towards Derwent, you're going to head back towards Derwent so turn right here (see image 17).
8. After the right turn, you will start to walk downhill, with the reservoir almost constantly in front of you, off in the distance. After about 150m (about a minute and a half walk at an average pace) there will be a cairn on the path (see previous hover image), continue past this on the same path which will have started to veer slightly to the right, across the hillside, but still in a generally downwards direction. You may have noticed a stone wall (see image 18) off in the distance on your left-hand side; the path you are on will eventually meet this wall and continue alongside it for a short distance before you will leave it (around 50m, or 35 seconds walking at a normal pace). After this distance, the path with split, with one section continuing forward alongside the wall, and the other veering off to the left through a gap in the wall towards a woodland; make sure you follow the path which goes through the gap in the wall.
9. Continue to follow the path heading towards the woodland, as you approach it you will notice a stone wall in front of the woodland and another wall perpendicular to it (i.e. making a right angle with it) which almost come together to form a corner (see image 19), here there is a path which runs between the walls, running alongside the woodland (which will be on your left) but never entering it.
10. Follow this path and you will eventually reach the end of the woodland, continue on until you reach a wooden gate (gate 1 on the next hover image). Go through the gate and continue to follow the path, there are no side paths so this section of the hike is relatively straight forward. The path will continue to run alongside the stone wall until you reach another wooden gate (gate 2 on next hover image), which you should pass through. The path will start to turn left and then not far after this you willl reach an old abandonded farmhouse with out buildings. The first building (stone building 1 on the next hover image) you pass will be on your right, you can go in here for shelter and rest. After passing this first building there will be another building on your left (stone building 2 on next hover image) and one in front of you (stone building 3 on next hover image), turn left at the stone building on your left and go through the gate, the reservoir should be in front of you in the distance; use image 20 to aid with navigation if needed.
11. Follow the path until you reach a crossroad, there will be 2 paths in front of you, and then another path behind you, you want to take the left path of the 2 in front of you (see image 21). From here just follow the path as it bends and hugs the edge of the reservoir, you'll pass over a bridge and walk past houses and eventually, you will end up back at the same dam that you passed at the very start of the hike (Derwent Dam). When you see the dam, the road will start to bend to your left and this path will take you back to the car park and the start point of the hike, near to the visitor centre.

Direction of Travel

Direction of Travel

Direction of Travel


Direction of Travel


Direction of Travel


Direction of Travel


Stone Farmhouse & Out Buildings
Crossroad

Direction of Travel
gallery
 shutterstock_720778240 |  View Over Farm Buidlings on the Derwent Edge Hike |  Derwent Dam on the Derwent Edge Hike |
|---|---|---|
 Beautiful Flower & Derwent Dam on the Derwent Edge Hike |  Derwent Edge Sign on the Derwent Edge Hike |  Forest on the Derwent Edge Hike |
 Path Near Forest River on the Derwent Edge Hike | 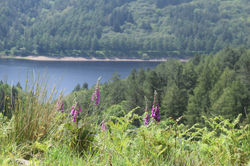 View to Derwent Reservoir on the Derwent Edge Hike |  View Along Ruined Stone Wall Towards Ladybower Reservoir on the Derwent Edge Hike |
 Path to Lost Lad on the Derwent Edge Hike |  Cairn & Toposcope on Last Lad on The Derwent Edge Hike |  Toposcope on Lost Lad on the Derwent Edge Hike |
 Path to Back Tor on the Derwent Edge Hike |  Back Tor, Trig Point & Sheep on the Derwent Edge Hike |  View From Back Tor Trig Point on the Derwent Edge Hike |
 Stone Wall & Fields on the Derwent Edge Hike |  Engraving on Stone Farm Building on the Derwent Edge Hike |  Rock Formation & Shallow Pool on the Derwent Edge Hike |
 Derwent Reservoir & Farm Buildings on the Derwent Edge Hike |  Stunning View on the Derwent Edge Hike |  Sign on The Derwent Edge Hike |
 Moorland Regeneration Sign on the Derwent Edge Hike |  Derwent & Moscar Route Sign on the Derwent Edge Hike |  Flagged Path on the Derwent Edge Hike |
 Unusual Rock Formation on the Derwent Edge Hike |  Funny Gate Sign on the Derwent Edge Hike |  View Over Derwent Reservoir & Rolling Hills on the Derwent Edge Hike |
 Sunset Over Derwent Reservoir on the Derwent Edge Hike |
hints & Tips
consider the weather
-
This hike is best attempted using a navigation app on your phone, a GPS device or a map and compass due to some difficult-to-navigate sections with low signage
-
The weather can turn quickly so be sure to wear appropriate footwear, and take waterproofs and layers as necessary
-
Start the walk early and check what time the sun will set; unless you're confident navigating at night
-
On hot, sunny days make sure to pack plenty of water and sun cream as there is very little shade to be found
Sunset hike
If sunsets are your thing (and let's be honest, who doesn't love a good sunset), head to Derwent Edge just before golden hour to catch a sunset you'll never forget. Behold a menagerie of colours, from the vibrant purple heather to the lush green vegetation and sparkling blue water of the nearby reservoirs, all will be tinted by the warm reddish glow of the setting sun. Another bonus of watching the sunset at Derwent Edge is that you're likely to have it all to yourself, there is no quick or easy way to get there, unlike other escarpments such as Stanage and Bamford which have car parks nearby and often get very busy.
Facilities & Hospitality
The Fairholmes site at the beginning of the hike consists of a small visitor centre, hot and cold food kiosk, public toilets, a ranger base and a cycle hire centre. Click here ↗ for more info.
Interesting Facts
The Lost Lad of Derwent Village
Most people who journey to Lost Lad ponder the origins of its intriguing name; for the denizens of nearby villages, the harrowing tale surrounding its roots has passed into local folklore. The story begins with Abraham Lowe, a 13-year-old shepherd boy who lived with his mother in the now-lost village of Derwent ↗. On a cold winter's day, Abraham went to gather his sheep that were grazing on the moorlands of the Dark Peak, and as always, his faithful dog accompanied him. As time went by, the weather deteriorated until a ferocious snowstorm enveloped the hills. Despite his excellent knowledge of the landscape, Abraham and his devoted friend became lost; for countless hours they wandered the moors, searching for a way home, but as night arrived and hypothermia set in, they huddled together to try and endure the storm. When he didn't return that night, his mother ventured out to search the hills but her efforts were in vain. It wasn’t until the following spring that a local shepherd found Abraham's body; he lay in a fetal position, and on a gritstone slab next to him, he had scratched the words "Lost Lad". As the legend goes, his faithful dog was found alive by his side after all those many months. The large cairn which lies at the summit of the hill is said to have been created by passing shepherds as a mark of respect for Abraham, they would add a stone to the ever-growing pile as they passed by. Over the years there have been many reports of a young boy with a dog, walking the windswept moors during stormy weather in the winter months; the lost lad of Derwent and his faithful companion, still trying to find their way home.
Dambusters
It's March 1943, World War 2 is in full swing and the RAF’s Bomber Command has secretly assembled an elite Squadron, charged with carrying out an audacious night-time mission to disable Germany’s industrial heartland. Code-named Operation Chastise, this epic raid is to be led by flying ace Wing Commander Guy Gibson, accompanied by crews chosen for their prowess and ''press-on spirit''. With just two months to prepare, the squadron eternally remembered as ''The Dam Busters'', started training with the famous bouncing bomb at Derwent Reservoir, Derbyshire. 133 aircrew in 19 Lancasters took off to bomb the dams. Of those, 53 men were killed and three became prisoners of war.
The operation took place on 16th May 1943, it aimed to destroy the Möhne, Eder, and Sorpe dams in the Ruhr valley; the loss of hydroelectric power coupled with the devastation of the flooding would greatly impact industries supporting the German war effort. To successfully pull off this feat, an innovative new war weapon was needed, one which could evade German torpedo nets, whilst accurately targeting the base of the dam. A Ripley-born inventor called Barnes Wallis answered the call and developed the revolutionary bouncing bomb, code-named ''Upkeep'', which when dropped at the right speed, rotation, height, and distance from its target, would bounce off the surface of the water until it reached the dam, where it would sink to its base and explode. Crews flying modified Lancaster bombers used Derwent Reservoir to practice bombing runs for the mission, as the dam had a close resemblance to the Rhur Valley targets.
